I have been thinking a lot lately about how properly and simply to implement database versioning strategy. These years I’ve experienced working with different types of database setup and furthermore researched and analyzed some more approaches and tools regarding this topic. In this posting I write about my findings and why I like Fluent Migrator as a help tool in order to get the job done. But first, let’s talk about the goals we try to achieve.
Goals
- Auditing schema changes
- Auditing test data changes
- Keeping schema and test data integrity across machines
- Versioning via source version control systems
- DB-provider agnostic migration (MSSQL, PostgreSql, MySql, Oracle)
- Simple and automated migration strategy (local and in production)
- New developers on project should not sweat while making the database work on their machines, neither the CI server
Links to Fluent Migrator and this guide’s project.
In the end - all you just need to do is run MSBuildMigrator.Migrate.bat file and watch your database being deployed, upgraded, downgraded…it will figure out ;) .
Step by step guide
1. Open Visual Studio and create New Class Library Project

2. Install-Package FluentMigrator

3. Create new folder “Migrations” to project - here we are going to store migration files

4. Now, let’s create database tables with migration files
[FluentMigrator.Migration(0)]
public class Baseline : FluentMigrator.Migration
{
    public override void Up()
    {
        Create.Table("Category")
            .WithColumn("Id").AsGuid().NotNullable().PrimaryKey()
            .WithColumn("Name").AsString(255);

        Create.Table("Product")
            .WithColumn("Id").AsGuid().NotNullable().PrimaryKey()
            .WithColumn("CategoryId").AsGuid().ForeignKey("Category", "Id")
            .WithColumn("Name").AsString(255)
            .WithColumn("Price").AsDecimal();
    }

    public override void Down()
    {
        Delete.Table("Product");
        Delete.Table("Category");
    }
}
That is all what is needed. In essence a migration is a class which drives from Migration abstract class and implements ‘Up’ and ‘Down’ methods. Additionally you will also need to define Migration Attribute with unique identifier in order the migration runner to know the order of migration files. I like it how FM API is designed, it really follows the SQL language and how I would write this script in plain SQL. Read further here.
Just for providing more examples I have added one more migration file for adding one more column to Product table for storing image URL.
[Migration(201411131100)]
public class M201411131100_Product_added_column_for_storing_image_url : Migration
{
    public override void Up()
    {
        Alter.Table("Product")
            .AddColumn("ImageUrl").AsString(255);
    }

    public override void Down()
    {
        Delete.Column("ImageUrl").FromTable("Product");
    }
}
Now this is how everything looks in my solution.

Next, let’s initialize the database with our script.
5. Creating Migration Runner (MSBuild), Migrator (.BAT) and ConnectionStrings (.CONFIG)

1. MSBuildMigrationRunner.proj
<?xml version="1.0"?>
<Project xmlns="http://schemas.microsoft.com/developer/msbuild/2003" DefaultTargets="Migrate">
 <PropertyGroup>
  <DatabaseProvider></DatabaseProvider>
  <ConnectionStringConfigPath></ConnectionStringConfigPath>
  <ConnectionStringName></ConnectionStringName>
  <DataMigrationProjectName>DatabaseMigrationsExample</DataMigrationProjectName>
  <DataMigrationProjectRootPath>$(MSBuildProjectDirectory)</DataMigrationProjectRootPath>
  <MigratorTasksDirectory></MigratorTasksDirectory>

  <DataMigrationProjectBuildDLL>$(DataMigrationProjectRootPath)\bin\Debug\$(DataMigrationProjectName).dll</DataMigrationProjectBuildDLL>
  <DataMigrationProjectCsproj>$(DataMigrationProjectRootPath)\$(DataMigrationProjectName).csproj</DataMigrationProjectCsproj>
 </PropertyGroup>

 <UsingTask TaskName="FluentMigrator.MSBuild.Migrate" AssemblyFile="$(MigratorTasksDirectory)FluentMigrator.MSBuild.dll"/>

 <Target Name="Build">
  <MSBuild Projects="$(DataMigrationProjectCsproj)" Properties="Configuration=Debug"/>
 </Target>

 <Target Name="Migrate" DependsOnTargets="Build">
  <Message Text="Starting FluentMigrator Migration"/>
  <Migrate Database="$(DatabaseProvider)"
     Connection="$(ConnectionStringName)"
     ConnectionStringConfigPath="$(ConnectionStringConfigPath)"
     Target="$(DataMigrationProjectBuildDLL)"
     Output="True"
     Verbose="True">
  </Migrate>
 </Target>

 <Target Name="MigratePreview" DependsOnTargets="Build">
  <Message Text="Previewing FluentMigrator Migration"/>
  <Migrate Database="$(DatabaseProvider)"
     Connection="$(ConnectionStringName)"
     ConnectionStringConfigPath="$(ConnectionStringConfigPath)"
     Target="$(DataMigrationProjectBuildDLL)"
     Output="True"
     Verbose="True"
     PreviewOnly="True">
  </Migrate>
 </Target>
</Project>
2. ConnectionStrings.config
<?xml version="1.0" encoding="utf-8" ?>
<configuration>
 <connectionStrings>
  <clear />
  <add name="Default" connectionString="Server=###;User ID=###;Password=###;Database=###;"/>
 </connectionStrings>
</configuration>
3. MSBuildMigrator.Migrate.bat
C:\Windows\Microsoft.NET\Framework\v4.0.30319\MSBuild.exe MSBuildMigrationRunner.proj /t:Migrate /p:DatabaseProvider=SqlServer2012 /p:ConnectionStringConfigPath=ConnectionStrings.config /p:ConnectionStringName=Default /p:DataMigrationProjectName=DatabaseMigrationsExample /p:DataMigrationProjectRootPath=. /p:MigratorTasksDirectory=..\packages\FluentMigrator.1.3.1.0\tools\
pause- /t:Migrate - performs Migration
- /t:MigratePreview - performs previewing of what would happen when migration is called
- /p:DatabaseProvider=? - specify your database providers name (SqlServer2012, postgres, mysql, oracle, sqlite and other can be found in FluentMigrator documentation)
- /p:ConnectionStringConfigPath=? - path to connection strings file
- /p:ConnectionStringName=? - name of the connection string to use from the configuration file
- /p:DataMigrationProjectName=? - Visual Studio project name where your migration files reside
- /p:DataMigrationProjectRootPath=? - path to where your Visual Studio migration project resides
- /p:MigratorTasksDirectory=? - path to FluentMigrator tools folder
Viola, this is all you need to do. For your project you will need to put the connection string to your database and make changes where needed in the .BAT file, such as database provider and project name as an essential changes. Other config stuff should be pretty common, but if you have different structure than mine, you have full power and control with the flexibility provided here.
5. Run your MSBuildMigrator.Migrate.bat file

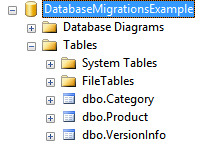
Table VersionInfo is used for storing migration metadata.

All of our tables are created.

In VersionInfo table you can see the “commits”.

Rules of Thumb
- First migration is always called “BaseLine” with migration ID: 0. Everything starts from there.
- Migration unique identification number is composed of current datetime when the migration is being created in format #yyyyMMddhhmm##
(example: now is 2014-11-13 10:15, so migration ID would be 201411131015) - Migration filename should explain what is being changed - just like how you would write a commit message - in format ‘M#yyyyMMddhhmm#_Message.cs’
(example: M201411131015_created_all_initial_tables) - Class name should follow the exact convention like the filename
(example: class M201411131015_created_all_initial_tables { .. } - MSBuildMigrationRunner.proj, ConnectionStrings.config, MSBuildMigrator.Migrate.bat are stored in Migration project root folder
Happy coding folks! Having questions or concerns? Shoot me a tweet -> @bojanv91