Select2’s adapter pattern (introduced in version 4.0) lets you extend its features and behavior. I’ve built custom select components for dashboards and search UIs using this approach.
The docs skip implementation examples. This article shows how to build custom adapters and decorators.
What are adapters and decorators in Select2?
Adapter, adapts interface of an existing class to another interface. For example replacing the appearance of the selection input element with icon element.
Decorator, attach additional responsibilities to an object dynamically. For example adding functional checkboxes in multiple select dropdown items, or dedicated search field in multiple selection dropdown.
Select2 has several built-in adapters that can be used, overridden, and modified. You can find them explained in the advanced section in the docs, and their source code in the GitHub repository. For example, here is how SelectionAdapter is implemented (link to source file).
I learn adapter patterns by reading Select2’s source code. The internal implementations show practical patterns you can reuse in your own apps.
You can take total control of the appearance and behavior of select2-based elements in your web apps by learning and exposing the full potential of this feature.
Defining and using custom adapters
A Select2 adapter is defined using an AMD module. Adapters can use other adapters or objects (to extend or decorate) by taking AMD module dependencies. Select2 automatically loads modules when the adapters are being constructed.
$.fn.select2.amd.define("CustomSelectionAdapter",
    [
        "select2/utils",
        "select2/selection/multiple",
        "select2/selection/placeholder",
        "select2/selection/eventRelay",
        "select2/selection/single",
    ],
    function (Utils, MultipleSelection, Placeholder, EventRelay, SingleSelection) {
        // Here goes the code of this custom adapter
    }
);
This defines a custom SelectionAdapter. I execute this once at application start, right after loading jQuery and Select2. In single-page apps, I use lazy execution - define the adapter just before first use.
Custom adapters can be used when constructing select2 elements, by requiring the AMD module in which they are defined to the select2 configuration API. Here’s how you use the adapter we just defined:
$(htmlElement).select2({
    data: sampleDataAsArray,
    selectionAdapter: $.fn.select2.amd.require("CustomSelectionAdapter")
});
Now, the htmlElement will be transformed to a select2 element with customized selection interface and behavior, as defined in CustomSelectionAdapter. Besides customizing the selectionAdapter, you can customize also the resultsAdapter, dataAdapter, ajaxAdapter, resultsAdapter, and dropdownAdapter.
Critical gotcha: EventRelay must be in the decorator chain or selection events fail silently. I’ve debugged this multiple times when custom adapters stopped firing selected and change events. You’ll see EventRelay included in the examples below.
Example: Custom multiple select
This example demonstrates the full power of adapters and decorators feature. It extendsSelectionAdapter and DropdownAdapter to fulfil the goals.
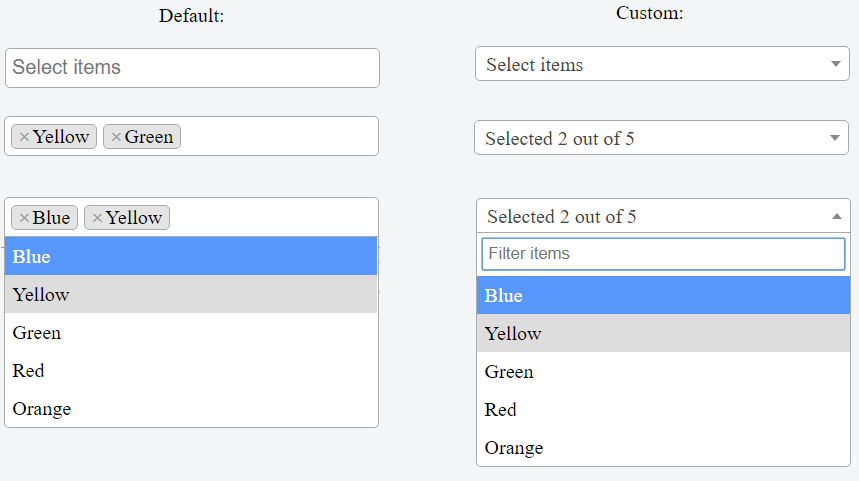
Default behavior of the multiple select, to be modified is:
- Ability to search for items directly from the selection-box.
- Show selected items in the selection-box.
Desired new behavior:
- Ability to search items from a dedicated search box, shown in the dropdown (same as in single select).
- Show number of selected items out of the total in the selection-box. Also, show arrow icon in the selection-box.
At image bellow, the default and desired outcomes are visualized.
To make select2 do the desired behavior, two custom adapters need to be written, a SelectionAdapter and a DropdownAdapter.
Find the complete solution example on jsFiddle.
Step 1 - create custom selection adapter
$.fn.select2.amd.define("CustomSelectionAdapter", [
    "select2/utils",
    "select2/selection/multiple",
    "select2/selection/placeholder",
    "select2/selection/eventRelay",
    "select2/selection/single",
  ],
  function(Utils, MultipleSelection, Placeholder, EventRelay, SingleSelection) {

    // Decorates MultipleSelection with Placeholder
    let adapter = Utils.Decorate(MultipleSelection, Placeholder);
    // Decorates adapter with EventRelay - ensures events will continue to fire
    // e.g. selected, changed
    adapter = Utils.Decorate(adapter, EventRelay);

    adapter.prototype.render = function() {
      // Use selection-box from SingleSelection adapter
      // This implementation overrides the default implementation
      let $selection = SingleSelection.prototype.render.call(this);
      return $selection;
    };

    adapter.prototype.update = function(data) {
      // copy and modify SingleSelection adapter
      this.clear();

      let $rendered = this.$selection.find('.select2-selection__rendered');
      let noItemsSelected = data.length === 0;
      let formatted = "";

      if (noItemsSelected) {
        formatted = this.options.get("placeholder") || "";
      } else {
        let itemsData = {
          selected: data || [],
          all: this.$element.find("option") || []
        };
        // Pass selected and all items to display method
        // which calls templateSelection
        formatted = this.display(itemsData, $rendered);
      }

      $rendered.empty().append(formatted);
      $rendered.prop('title', formatted);
    };

    return adapter;
  });
Step 2 - create custom dropdown adapter
$.fn.select2.amd.define("CustomDropdownAdapter", [
    "select2/utils",
    "select2/dropdown",
    "select2/dropdown/attachBody",
    "select2/dropdown/attachContainer",
    "select2/dropdown/search",
    "select2/dropdown/minimumResultsForSearch"
  ],
  function(Utils, Dropdown, AttachBody, AttachContainer, Search, MinimumResultsForSearch) {

    // Decorate Dropdown with Search functionalities
    let dropdownWithSearch = Utils.Decorate(Dropdown, Search);
    dropdownWithSearch.prototype.render = function() {
      // Copy and modify default search render method
      var $rendered = Dropdown.prototype.render.call(this);
      // Add ability for a placeholder in the search box
      let placeholder = this.options.get("placeholderForSearch") || "";
      var $search = $(
        '<span class="select2-search select2-search--dropdown">' +
        '<input class="select2-search__field" placeholder="' + placeholder + '" type="search"' +
        ' tabindex="-1" autocomplete="off" autocorrect="off" autocapitalize="off"' +
        ' spellcheck="false" role="textbox" />' +
        '</span>'
      );

      this.$searchContainer = $search;
      this.$search = $search.find('input');

      $rendered.prepend($search);
      return $rendered;
    };

    // Decorate the dropdown+search with necessary containers
    let adapter = Utils.Decorate(dropdownWithSearch, AttachContainer);
    adapter = Utils.Decorate(adapter, AttachBody);

    return adapter;
  });
Step 3 - use the defined adapters
$("#multipleWithSearch").select2({
  data: testData,
  placeholder: "Select items",
  placeholderForSearch: "Filter items",  // additional placeholder for search box
  closeOnSelect: false,
  // Make selection-box similar to single select
  selectionAdapter: $.fn.select2.amd.require("CustomSelectionAdapter"),
  templateSelection: (data) => {
    return `Selected ${data.selected.length} out of ${data.all.length}`;
  },
  // Add search box in dropdown
  dropdownAdapter: $.fn.select2.amd.require("CustomDropdownAdapter")
});
Find the complete solution example on jsFiddle.
Summary
This article explains how you can extend Select2 plugin by utilizing its adapters and decorators feature.
To create better custom adapters, try to re-use the built-in adapters, and modify them on the go. By doing that you will learn more about select2 internals, thus your custom adapters will be much cleaner and you will have less code to debug.
Finally, observe the example code on jsFiddle, modify it and see how you can further customize select2 as per your needs.
NOTE: I use the select2 plugin in my Aurelia apps by wrapping common behavior in custom elements. So far, so good. It’s nice that we are able to easily re-use proven components/plugins from other major platforms.